
How to Change an RV Water Heater Anode Rod (Step-by-Step)
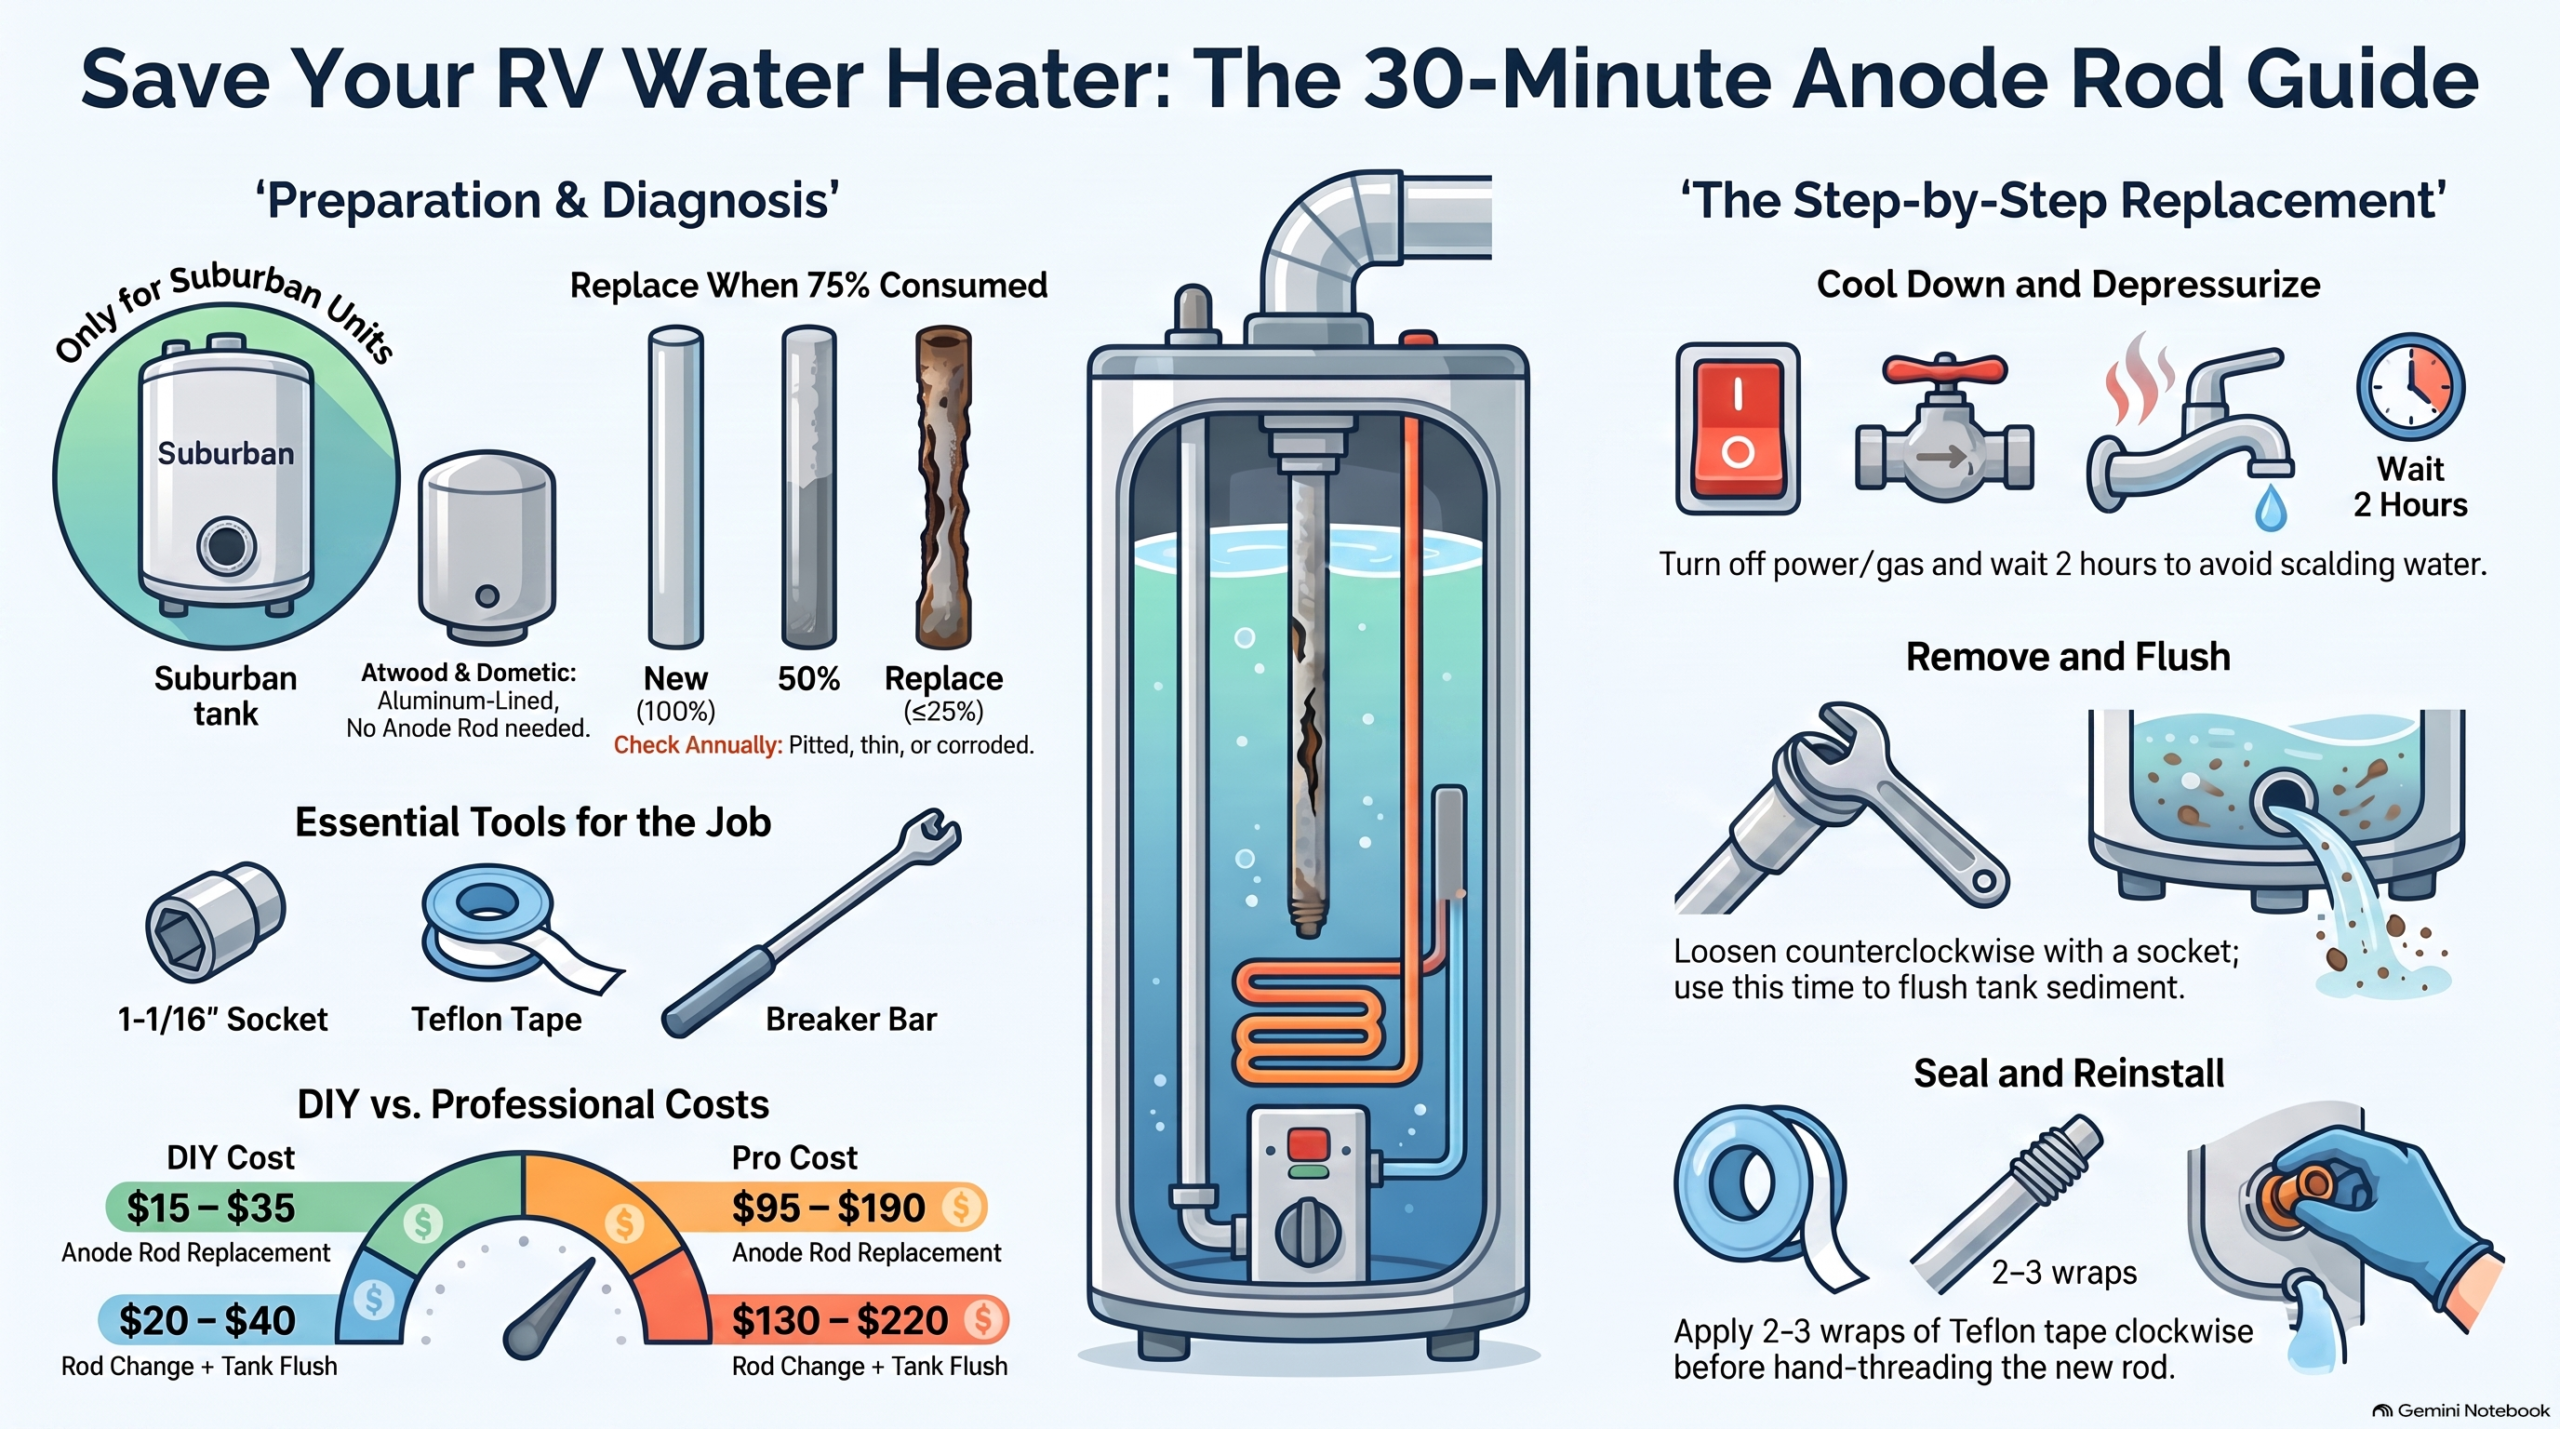
The anode rod is a $15 part that keeps a $600 water heater tank from corroding. On Suburban RV water heaters, it’s the single most important maintenance item — and the one most people skip because they don’t know it exists.
This guide walks you through exactly how to replace it: what tools you need, how to remove the old one without stripping it, what to buy as a replacement, and when to check it rather than automatically replacing it.
Does Your Water Heater Have an Anode Rod?
Only Suburban RV water heaters have anode rods. Atwood and Dometic units use aluminum-lined tanks that don’t require one. If your unit says Atwood or Dometic on the exterior door, you don’t have an anode rod — you have a plastic drain plug instead. Don’t go looking for one.
How to confirm your heater is Suburban: look at the exterior access door. Suburban units have the brand name printed prominently and use a hex-head anode rod (1-1/16″ socket) threaded into the bottom of the tank, accessible from outside the RV.
When to Replace the Anode Rod
The short answer: annually, or when more than 75% of the rod is consumed.
The longer answer: check it every season. A healthy anode rod looks like a solid magnesium bar with minor surface corrosion. A rod that needs replacement looks pitted, thin, or mostly gone. If the rod is completely consumed — bare steel core with no magnesium remaining — the tank has been unprotected and may already have corrosion inside.
Other signs you’re overdue: rusty or discolored hot water, rotten egg smell from hot water (magnesium reacting with sulfur bacteria), sediment in the hot water flow.
What You Need
- 1-1/16″ socket wrench (sometimes called a camper water heater socket) — a standard 1-1/16″ deep socket works
- Breaker bar or long-handle ratchet — these rods can be on tight, especially if they haven’t been changed in years
- Teflon tape (thread seal tape)
- Bucket to catch water when the rod comes out
- Replacement anode rod — Suburban OEM or a compatible aftermarket rod. Magnesium is standard. Aluminum-zinc if you have sulfur smell issues.
Budget: $15–$30 for a magnesium rod, $20–$35 for aluminum-zinc.
Step-by-Step Replacement
Before you start: The water heater must be completely cool. Never remove the anode rod from a hot or even warm water heater — scalding water under pressure will come out when the rod breaks the seal. Wait at least 2 hours after the last heating cycle.
- Turn off the water heater. Switch off both the gas and electric sides.
- Turn off water supply. Shut off the water pump and the city water inlet valve (or disconnect the city water hose).
- Open the hot water faucet inside the RV to release pressure. Leave it open.
- Open the exterior water heater access door. Look for the anode rod — it’s a 4–8″ hex-head plug at the bottom of the tank, usually on the right side as you face the compartment.
- Place your bucket under the anode rod. When it comes out, water will drain — expect up to several gallons depending on tank size.
- Loosen the rod counterclockwise with your 1-1/16″ socket. If it hasn’t been changed in years, it may be on tight — use a breaker bar and apply steady pressure. Don’t use an impact driver; the sudden force can crack the tank fitting.
- Remove the rod and inspect it. If less than 75% consumed, it may be good for another season. If heavily consumed or gone, replace immediately.
- Let the tank drain through the opening while the rod is out. This is a good opportunity to flush sediment — use a tank flush wand if you have one.
- Wrap new rod threads with Teflon tape. 2–3 wraps, clockwise around the threads. This prevents the rod from seizing in place during the next change cycle.
- Thread in the new rod by hand first, then tighten with the socket. Firm is enough — don’t overtighten or you’ll crack the tank fitting. Approximately 30 ft-lbs is the Suburban spec.
- Close the interior hot water faucet, restore water supply, and let the tank refill completely before turning the water heater back on.
- Check for leaks around the rod before closing the access door.
Magnesium vs. Aluminum-Zinc: Which Rod to Buy
Magnesium is the standard and the better corrosion protector for most water supplies. It’s what Suburban installs from the factory.
Aluminum-zinc is the right choice if you have persistent rotten egg or sulfur smell from your hot water. Magnesium reacts with sulfur bacteria naturally present in some water supplies — the result is hydrogen sulfide gas, which smells like rotten eggs. Switching to aluminum-zinc eliminates the reaction and the smell. It provides slightly less corrosion protection than magnesium, but it’s the right tradeoff when sulfur smell is an issue.
Don’t use a magnesium rod if you have consistent sulfur smell problems. Don’t switch to aluminum-zinc unnecessarily if you don’t.
Common Mistakes
- Removing it while hot. Don’t. Scalding water under pressure will come out fast.
- Skipping the Teflon tape. The rod will seize in place with mineral deposits. Next time you try to remove it, you risk stripping the tank fitting — a much more expensive problem.
- Overtightening. The tank fitting is brass. Cracks are expensive to fix — usually requires water heater replacement.
- Using an impact driver. The sudden rotational force can crack the fitting or tank. Use a breaker bar and steady pressure.
- Not flushing the tank while it’s drained. The rod-change is the perfect time to flush sediment. Takes 5 minutes and extends water heater life significantly.
What It Costs if You Hire It Out
| Service | DIY Cost | Pro Cost |
|---|---|---|
| Anode rod replacement (standard magnesium) | $15–$30 | $95–$180 |
| Anode rod replacement (aluminum-zinc) | $20–$35 | $100–$190 |
| Rod replacement + tank flush | $20–$40 | $130–$220 |
This is one of the best returns on DIY time in RV maintenance. $20 in parts and 30 minutes of your time saves $100–$180 in labor and extends the life of a $600–$900 tank.
Frequently Asked Questions
Do Atwood or Dometic water heaters have anode rods?
No. They use aluminum-lined tanks that don’t require sacrificial protection. Their drain plugs look similar to an anode rod location but serve a different purpose. Do not install an anode rod in an Atwood or Dometic unit.
How do I know if my anode rod is stuck?
If it doesn’t break loose with a 1/2″ drive breaker bar and normal force, don’t keep cranking — you risk cracking the fitting. Try penetrating oil around the base of the rod first, let it soak, then try again. If it’s genuinely stuck after that, a tech with the right tools is the safer call.
My hot water smells like rotten eggs. Will a new anode rod fix it?
If you currently have a magnesium rod and use groundwater or well water, yes — switch to aluminum-zinc. Also flush the tank thoroughly and sanitize with a hydrogen peroxide solution to kill any existing sulfur bacteria colony in the tank.
Can I go longer than a year between changes?
Depends on water hardness and how much the heater runs. Check it at 12 months — if it’s less than 50% consumed, you can likely go another season. But check it; don’t guess.
Bottom line: Replacing a Suburban water heater anode rod takes 30 minutes, costs $15–$30 in parts, and directly prevents $600–$1,400 in tank replacements. Skip it for a few seasons and you’ll eventually pay with a corroded tank. Use Teflon tape on every installation and check it annually. That’s the whole maintenance story.
Need a hand with this?
Find a Lab-Vetted mobile tech or RV service shop near you through the RV Repair Lab directory.