RV Battery Wiring Diagram: Every Configuration Explained
Wiring RV batteries wrong is one of the most common — and damaging — mistakes RV owners make. A miswired bank can overheat, underperform, or destroy a new set of batteries in months. This guide covers every common RV battery wiring configuration with clear step-by-step instructions so you know exactly what to connect, where, and why.
The Basics: What the Terminals Mean
Every battery has a positive (+) terminal (usually red) and a negative (–) terminal (usually black). Voltage is measured across both terminals. Amp-hours (Ah) represents how much energy the battery can store. When you connect batteries together, the configuration determines whether you add voltage (series) or amp-hours (parallel).
Before you touch any terminals: disconnect shore power, turn off your battery disconnect switch, and work in a ventilated area. Lead-acid batteries off-gas hydrogen during charging — a spark near an open battery can cause an explosion.
Configuration 1: Single 12V Battery
The simplest setup. One 12V battery connects directly to your RV’s battery system. The positive terminal goes to the positive bus bar or main positive cable; the negative terminal goes to the chassis ground or negative bus bar.
Result: 12V at rated Ah capacity (e.g., 100Ah)
Best for: Occasional camping, small trailers, replacing a single battery
If you’re going this route with a new lithium battery, the Redodo 12V 100Ah is a straightforward drop-in for most Group 27 or 31 trays.
Configuration 2: Parallel Wiring (12V, More Ah)
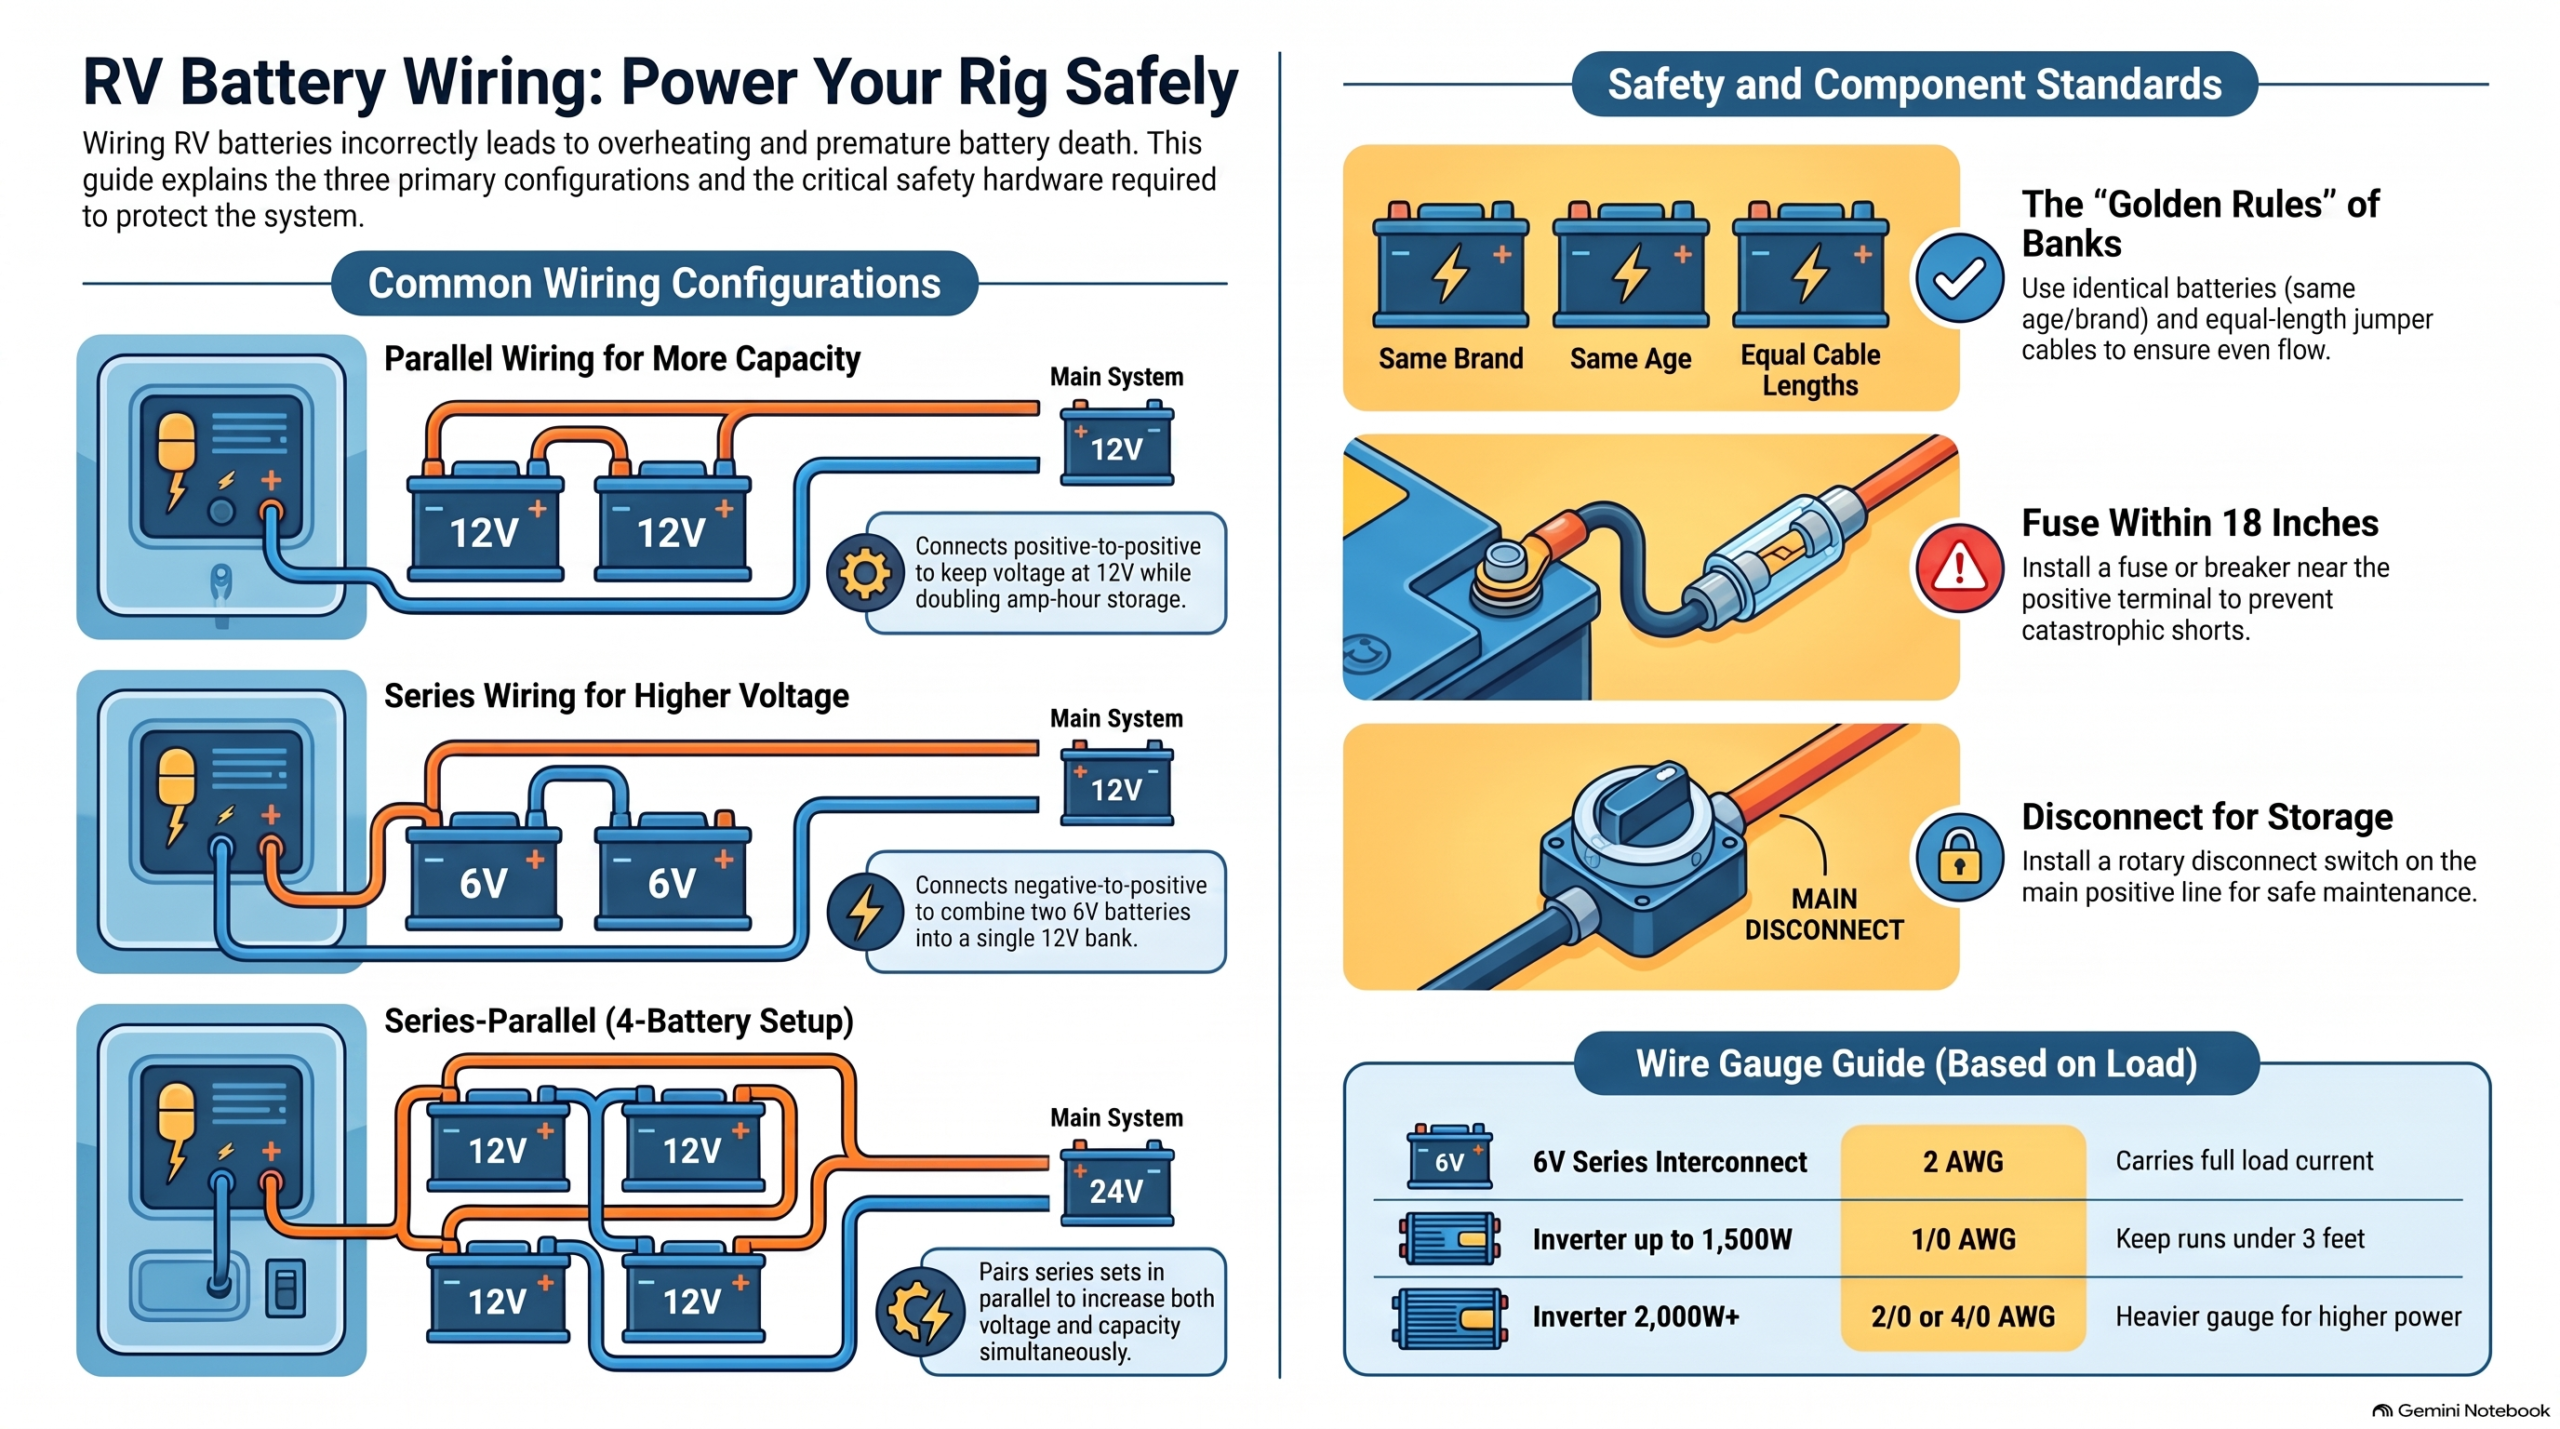
Parallel wiring connects positive to positive and negative to negative across two or more batteries. This keeps voltage at 12V but doubles (or triples) your amp-hour capacity.
How to wire two batteries in parallel:
- Connect Battery 1 positive (+) to Battery 2 positive (+) with a short jumper cable
- Connect Battery 1 negative (–) to Battery 2 negative (–) with a short jumper cable
- Connect your main positive load cable to Battery 1 positive and your main negative to Battery 2 negative (opposite corners)
Result: 12V at 2x Ah (e.g., two 100Ah batteries = 200Ah bank)
Critical: Use identical batteries (same brand, model, age, and state of charge before connecting). Use equal-length jumper cables. Connect your load and charge cables to opposite ends of the bank to ensure current flows evenly through all batteries.
Configuration 3: Series Wiring (Higher Voltage)
Series wiring adds voltage. This is almost exclusively used to wire two 6V batteries into a 12V bank — the standard setup for 6V golf cart batteries.
How to wire two 6V batteries in series:
- Connect Battery 1 negative (–) to Battery 2 positive (+) with a short jumper cable — this is the internal series connection
- Battery 1 positive (+) becomes your main positive output
- Battery 2 negative (–) becomes your main negative output
Result: 12V at the same Ah rating as a single battery (e.g., two 6V/225Ah batteries = 12V/225Ah)
Important: The internal series jumper cable carries the full load current. Use heavy-gauge cable — at least 2 AWG for most RV banks, 1/0 or 2/0 AWG if you’re running an inverter.
Configuration 4: Series-Parallel (Four 6V Batteries)
The most common multi-battery 6V setup. Build two series pairs, then connect those pairs in parallel to double the amp-hour capacity while keeping voltage at 12V.
How to wire four 6V batteries in series-parallel:
- Wire Battery 1 (–) to Battery 2 (+) — Series Pair A
- Wire Battery 3 (–) to Battery 4 (+) — Series Pair B
- Wire Battery 1 (+) to Battery 3 (+) — Parallel positive connection
- Wire Battery 2 (–) to Battery 4 (–) — Parallel negative connection
- Main positive output from Battery 1 (+); main negative output from Battery 4 (–)
Result: 12V at 2x the single battery Ah (e.g., four Trojan T-105s at 225Ah each = 12V/225Ah bank)
Wire Sizing Guide
| Application | Min. Wire Gauge | Notes |
|---|---|---|
| Battery to battery jumpers (parallel) | 4 AWG | Carries partial load; use equal lengths |
| Series interconnect (6V pairs) | 2 AWG | Carries full load current |
| Main battery-to-bus cables, inverter up to 1,500W | 1/0 AWG | Keep runs under 3 ft each way |
| Main cables, inverter 2,000W+ | 2/0 or 4/0 AWG | Longer runs need heavier gauge |
| Solar charge controller to battery | Sized to controller output | 10 AWG for 30A; 8 AWG for 50A |
For cables and terminals, marine-grade tinned copper wire is worth the premium for RV use — it resists corrosion far better than standard copper. Shop marine-grade battery cable on Amazon →
Fusing Your Battery Bank
Every battery bank needs a fuse or circuit breaker as close to the positive battery terminal as possible — within 18 inches. This protects the wiring from a catastrophic short circuit. For most RV battery systems:
- 100–200Ah bank without inverter: 100–150A ANL fuse or MIDI fuse
- 200–400Ah bank with 1,000W inverter: 200A ANL fuse
- Large bank with 2,000W+ inverter: 300–400A ANL fuse or Class T fuse
Shop ANL fuse holders on Amazon →
Adding a Disconnect Switch
A battery disconnect switch between your bank and your RV’s 12V system lets you cut power completely when the rig is in storage or when you need to work on the electrical system safely. Install it in the main positive line, within easy reach. A simple rotary disconnect handles most rigs; marine-grade switches from Blue Sea Systems are the go-to for durability. Read our full RV battery disconnect switch guide for top picks.
FAQ
Can I wire different capacity batteries in parallel?
You can, but you shouldn’t. Batteries with different capacities or different ages in a parallel bank will charge and discharge unevenly. The weaker battery pulls the stronger one down and vice versa, reducing total system performance and shortening battery life. Always match brands, models, and ages in a parallel bank.
How long should the cables be between batteries in parallel?
As short as possible and — critically — equal in length between all batteries. Unequal cable lengths create different resistance paths, causing current to distribute unevenly. In a 2-battery parallel bank, both jumper cables should be the same length even if that means running one a slightly longer path than necessary.
Do lithium batteries wire the same way as AGM?
Yes — the wiring configurations are identical. Parallel for more Ah at 12V, series for 6V pairs. The difference is that most lithium batteries for RVs come in 12V format, so you almost never need series wiring. You just wire them in parallel. The built-in BMS in each lithium battery handles cell balancing internally.
Bottom line: Parallel wiring is what most 12V lithium RV builds use. Series wiring is for 6V battery pairs. Always match batteries, use equal-length cables, fuse close to the positive terminal, and size your wire to the load. Get those four things right and your bank will perform safely for years. For battery recommendations, see our best lithium RV battery guide.